How to Flush Your Water Heater (and Why to Do It Yearly)
Home »

The Simple Truth About How to Flush a Water Heater (And Why Most Homeowners Skip It)
Knowing how to flush a water heater could be the single most valuable piece of home maintenance knowledge you pick up this year. Most homeowners never do it. And that oversight quietly costs them hundreds of dollars in energy bills and shaves years off their water heater’s life.
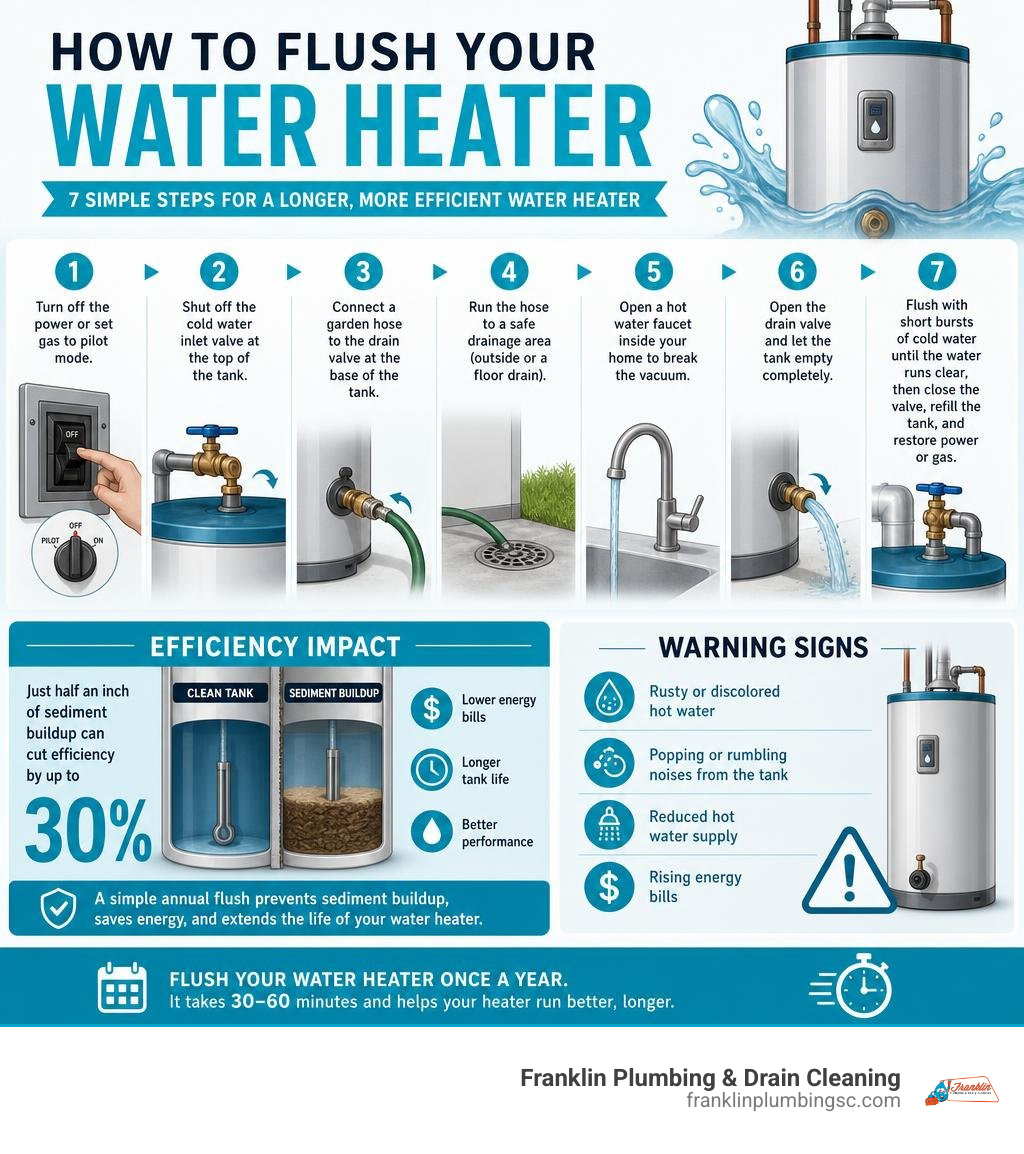
Here’s how to flush a tank water heater in 7 steps:
- Turn off the power (flip the breaker for electric) or set gas to pilot mode
- Shut off the cold water inlet valve at the top of the tank
- Connect a garden hose to the drain valve at the base of the tank
- Run the hose to a safe drainage area (outside or a floor drain)
- Open a hot water faucet inside your home to break the vacuum
- Open the drain valve and let the tank empty completely
- Flush with short bursts of cold water until the water runs clear, then close the valve, refill the tank, and restore power or gas
That’s the short version. The full process takes 30 to 60 minutes for most homeowners and costs nothing beyond basic tools you likely already own.
Here’s the problem: minerals in tap water sink to the bottom of your tank over time. That layer of sediment acts like insulation between the burner and the water. Your heater works harder, uses more energy, and wears out faster. Just half an inch of buildup can cut efficiency by up to 30%.
The good news? A simple annual flush prevents all of it.
Why You Need to Flush Your Water Heater Annually
Every time water enters your home in Columbia, SC, or West Columbia, SC, it brings dissolved minerals along with it. The most common culprit is calcium carbonate. When water is heated, these minerals crystallize, fall out of solution, and settle at the bottom of the tank as mineral deposits.
Over time, this sediment forms a thick, crusty layer. If you have an electric water heater, the sediment can bury the lower heating element, causing it to burn out. If you have a gas water heater, the sediment acts as a thermal barrier. Instead of directly heating the water, the gas burner has to heat the thick layer of crust first. This reduces thermal efficiency, forces longer heating cycles, and can cause monthly energy bills to climb.
Most tank water heaters benefit from a yearly flush. Homes with hard water may need more frequent maintenance because mineral scale can accumulate faster.
Failing to maintain your system does more than waste energy. It can shorten the system’s lifespan and contribute to noisy operation, reduced hot-water capacity, and avoidable repairs. If you are uncomfortable performing this maintenance yourself, scheduling professional plumbing services is a reliable way to have the system inspected and maintained safely.
If your water heater has become noisy, rusty, or unreliable, the warning signs in our guide to when a water heater may need replacement can help you decide when maintenance is no longer enough.
Signs Your Water Heater Needs Flushing
How do you know if your water heater is crying out for a flush? Your system will usually drop several hints before it fails completely. Here are the most common warning signs to watch for:
- Rumbling or popping noises: If your water heater sounds like a boiling tea kettle or a percussion section, sediment is a likely cause. Water can become trapped under the mineral crust at the bottom of the tank. As that water heats up, it boils, turns to steam, and bursts through the sediment layer, creating distinct popping or rumbling sounds.
- Discolored or rusty water: If your hot water looks cloudy, yellow, or rusty while your cold water runs clear, sediment may be stirring up inside the tank and traveling into your home’s plumbing lines.
- Lukewarm water or rapid loss of hot water: If your showers are getting colder much faster than they used to, sediment may be reducing the usable water volume inside your tank. A 50-gallon tank with 10 gallons of sediment has less room for hot water.
- A persistent sulfur or rotten-egg smell: Bacteria can thrive in the warm, dark, sediment-rich environment at the bottom of an unflushed tank. This bacterial activity can produce hydrogen sulfide gas, leading to an unpleasant odor whenever you run hot water.
- Spiking utility bills: If your energy costs are rising but your hot-water usage has remained the same, your system may be working overtime to heat through mineral layers.
Ignoring these issues can lead to major plumbing problems. If you notice these warning signs, schedule a professional inspection so a licensed plumber can assess sediment buildup, corrosion, and other potential damage.
How to Flush Water Heater Tanks Safely
Working on a water heater involves dealing with high electrical voltage or gas lines, high water pressure, and scalding hot water. Taking the proper safety precautions is not optional; it is required to prevent severe burns, electrical shock, or flooding in your home.
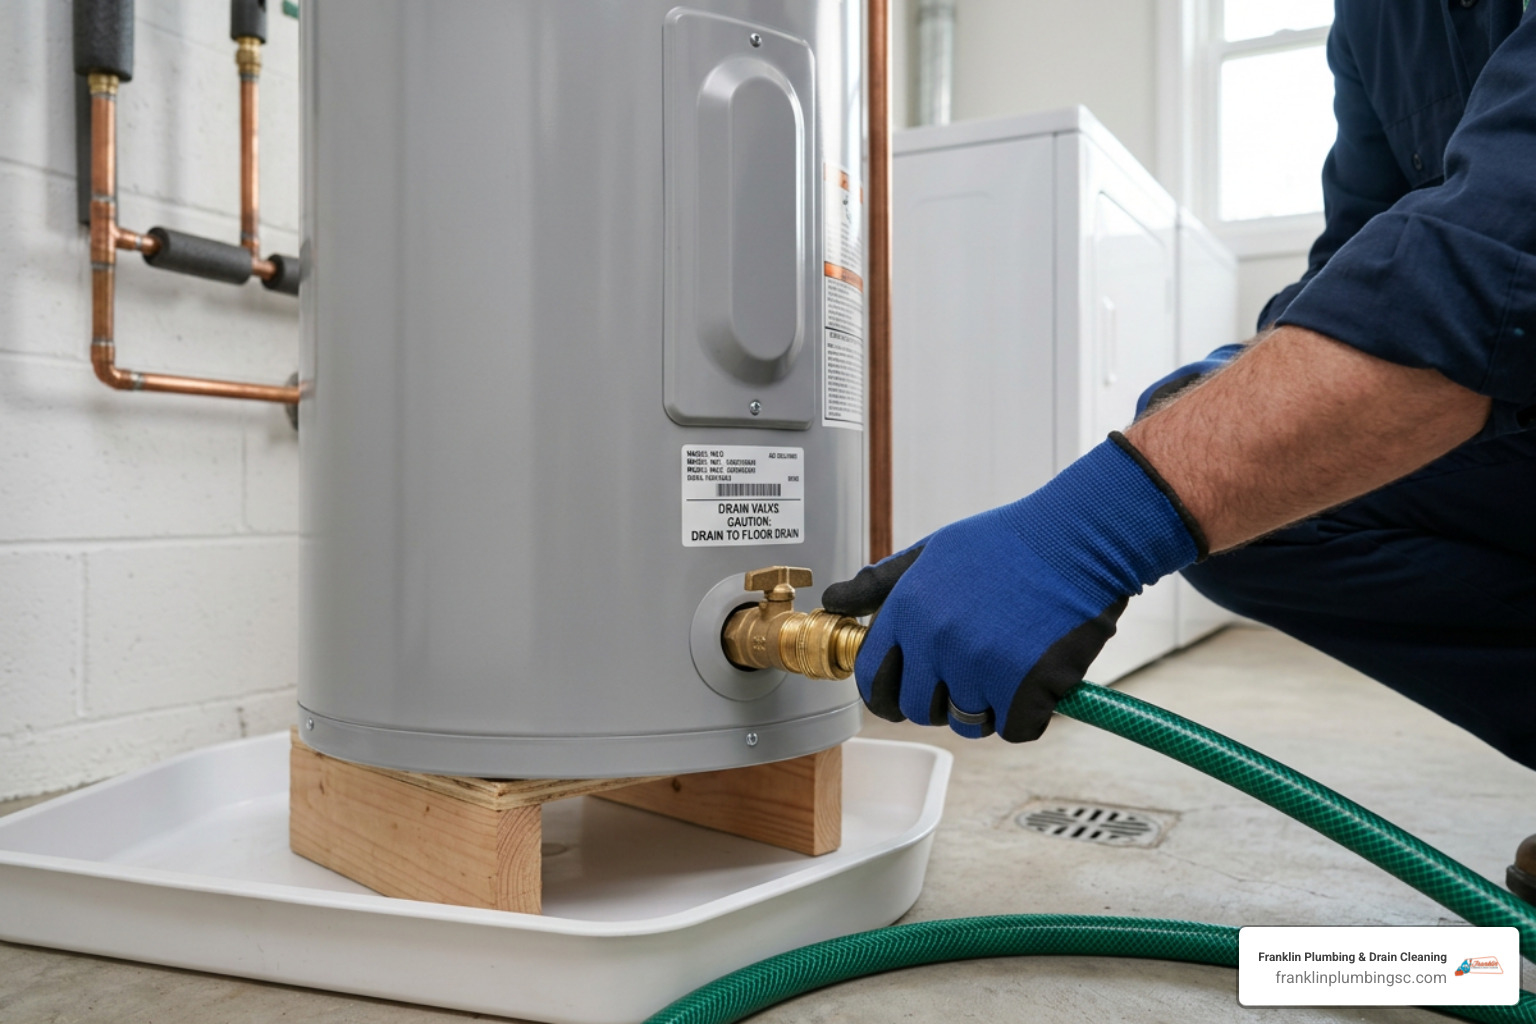
Before you begin, you must completely disable the heating source. If you have an electric water heater, locate your home’s main electrical panel and flip the circuit breaker designated for the water heater to the “off” position. If you have a gas water heater, locate the gas control valve on the front of the tank and turn the dial to the “pilot” or “off” position.
Never attempt to drain a water heater while the power or gas is fully active. Doing so can cause the heating elements to dry-fire and burn out in a matter of seconds, or cause a gas burner to crack the glass lining of an empty tank. Additionally, we highly recommend turning off the system the night before you plan to flush it. This allows the water inside the tank to cool down to a safe temperature, eliminating the risk of accidental scalding if a hose connection leaks.
Tools and Materials for the Job
You do not need an expensive toolkit to learn how to flush a water heater. Most of these items are already sitting in your garage or utility closet:
- Garden hose: A standard heavy duty garden hose that is long enough to reach from your water heater to a safe drainage area (like a driveway, yard, or floor drain).
- Flathead screwdriver: Used to open and close the slot on plastic or brass drain valves.
- Bucket: A large five gallon bucket is helpful for catching initial drips or testing water clarity.
- Work gloves: Thick, insulated gloves protect your hands from hot pipes and any hot water splashes.
- Safety goggles: Essential for protecting your eyes from pressurized water sprays or flying mineral debris.
Step-by-Step Guide: How to Flush Water Heater Tanks
Once you have gathered your tools and ensured the system is completely safe to work on, follow these steps to drain and flush your tank. This process aligns with the standard Building America guide on flushing to ensure a complete and thorough clean:
- Turn off the power or gas: Double check that the electric breaker is turned off or the gas control valve is set to the pilot position.
- Close the cold water inlet valve: Locate the pipe bringing cold water into the top of your water heater. Turn the valve handle clockwise to shut off the cold water supply. If your valve is a lever-style ball valve, turn it perpendicular to the pipe.
- Connect the garden hose: Locate the drain valve at the very bottom of the water heater tank. Remove the safety cap (if present) and screw the female end of your garden hose tightly onto the valve threads. Ensure the other end of the hose is directed to a safe drainage location that is lower than the water heater tank. Do not drain hot water onto delicate grass or garden plants.
- Open a hot water tap: Go to a bathroom or kitchen sink upstairs (or any faucet higher than the water heater) and turn on the hot water tap. This allows air to enter the plumbing system, breaking the vacuum inside the water heater tank and allowing it to drain smoothly.
- Open the drain valve: Use your flathead screwdriver or hand-turn dial to slowly open the drain valve. Water will begin flowing through the garden hose. Let the tank drain completely. This typically takes 20 to 40 minutes depending on the tank size and the level of sediment clogging the valve.
- Perform the cold water flush: Once the tank is completely empty, a large amount of sediment will still be clinging to the bottom. To dislodge this baked-on crust, open the cold water inlet valve at the top of the tank in short, 10 second bursts. This rushes cold water into the bottom of the tank, stirring up the sediment and washing it out through the drain hose. Repeat this process until the water coming out of the hose runs perfectly clear.
- Refill and restore power: Close the drain valve tightly and disconnect the garden hose. Keep the hot water tap inside your home open. Open the cold water inlet valve fully to begin refilling the tank. Once you hear water flowing smoothly out of your home’s open faucet without sputtering air bubbles, the tank is completely full. You can now close the indoor faucet. Finally, restore the power by flipping the electrical breaker back on, or turn your gas valve back to the “on” position and relight the pilot light if necessary.
How to Flush or Descale a Tankless Water Heater
Tankless water heaters are efficient, but they are not immune to the effects of hard water. Because they heat water on demand using compact, high-temperature heat exchangers, mineral scale can build up on the internal piping quickly.
This mineral scale acts as an insulator, forcing the tankless burner to operate at higher temperatures to achieve the same water warmth. Over time, that added thermal stress can damage the heat exchanger and lead to costly repairs. To keep your tankless unit running well, plan for routine descaling every one to two years. If you are uncomfortable handling cleaning solutions or pump equipment, our tankless water heater service team can handle the maintenance safely.
For help comparing equipment types before a replacement, our article on tankless versus tank water heaters in Lexington, SC explains the practical differences in maintenance, capacity, and installation considerations.
Descaling vs. How to Flush Water Heater Units Without Tanks
Unlike a traditional tank unit, you cannot clean a tankless water heater by simply opening a drain valve. Because mineral scale is chemically bonded to the narrow passages of the heat exchanger, you need to circulate a cleaning solution through the unit with a specialized pump system.
Here is how the tankless descaling process works:
- Isolate the unit: Turn off the electrical power supply and shut off the gas valve. Close the main blue cold-water inlet and red hot-water outlet isolation valves to disconnect the water heater from your home’s main plumbing system.
- Connect the pump kit: Remove the safety caps from the service-port valves on the isolation manifold. Connect color-coded hoses to these ports. Attach the cold-service hose to the outlet of a small submersible utility pump, and place the pump inside a large five-gallon bucket. Run the hot-service hose directly into the bucket as well.
- Add the cleaning solution: Fill the bucket with approximately three to four gallons of food-grade white vinegar. Do not use harsh chemical drain cleaners, as they can corrode the heat exchanger.
- Run the cleaning cycle: Open both service-port valves on the isolation manifold. Plug in the submersible pump to begin circulating the vinegar through the tankless unit. Let the pump run continuously for 45 to 60 minutes so the mild acid can break down mineral deposits.
- Flush and clean the filter: Turn off the pump and discard the dirty vinegar. Fill the bucket with clean water and run the pump for another five minutes to flush out the vinegar. Close the service-port valves, disconnect the hoses, and carefully remove the tankless unit’s cold-water inlet filter screen to rinse away trapped sediment before putting the system back into service.
When to Call a Professional Plumber
While many homeowners in areas like Blythewood, SC, or Chapin, SC, flush their water heaters every year, DIY maintenance is not recommended in every situation. Step back and call a licensed professional if you encounter any of the following:
- A stuck or corroded drain valve: If your drain valve is made of plastic, forcing it open with a screwdriver can cause it to snap off, resulting in uncontrolled water flow.
- A leaking temperature and pressure (T&P) relief valve: If you test your T&P valve during the flushing process and it continues to drip or fails to seal afterward, it should be replaced promptly by a professional to prevent dangerous pressure buildup.
- An older unit that has never been flushed: If your water heater is more than eight to 10 years old and has never been flushed, sediment may be concealing pinhole leaks caused by corrosion. Flushing can reveal those leaks.
- Gas-line concerns: If you smell gas near your water heater or are uncomfortable relighting a gas pilot light, do not attempt to service the unit yourself.
If safety concerns arise, specialized tools are required, or you are dealing with complex plumbing, electrical, or gas systems, stop and call a licensed plumbing professional. Franklin Plumbing & Drain Cleaning’s experienced team can help protect your home from water damage and gas-related hazards.
Frequently Asked Questions About Water Heater Maintenance
How often should you flush your water heater?
Most manufacturers recommend flushing your water heater once a year. However, if your home is supplied with hard municipal water or well water, you should flush the system every 6 months to prevent rapid sediment accumulation.
What happens if you don’t flush your water heater?
If you skip regular flushing, sediment will accumulate at the bottom of the tank. This leads to reduced heating efficiency, higher utility bills, noisy operation, damaged heating elements, and premature tank failure that can cause major indoor flooding.
How long does it take to flush a water heater?
The entire process generally takes between 30 and 60 minutes. Draining a 40 to 50 gallon tank takes about 20 to 30 minutes, while the cold water agitation flush and refilling process takes an additional 15 to 20 minutes.
Can I flush a water heater myself?
Yes, most homeowners can safely flush a standard tank water heater using basic household tools like a garden hose and a screwdriver. However, you must carefully follow all safety steps, including turning off the electricity or gas supply before draining.
Why is my water heater making a rumbling noise?
Rumbling or popping noises are caused by water pockets boiling and bursting through a thick layer of mineral sediment at the bottom of the tank. Flushing the tank to remove this sediment will usually eliminate the noise completely.
Should I flush an old water heater that has never been flushed?
If your water heater is over 8 years old and has never been flushed, you should proceed with caution. The sediment may be covering rust spots that are keeping the tank from leaking. It is best to have a licensed plumber evaluate the system first.
How do I know if my water heater has sediment buildup?
Common indicators include popping or rumbling sounds coming from the tank, cloudy or rust-colored hot water, a reduction in hot water capacity, longer recovery times, and unexplained increases in your monthly energy bills.
Do tankless water heaters need to be flushed?
Yes, tankless water heaters must be flushed or descaled using a vinegar solution and a recirculation pump every 1 to 2 years. This process removes mineral scale from the narrow copper tubes inside the heat exchanger.
Can flushing a water heater cause leaks?
Flushing a well-maintained water heater will not cause leaks. However, on older, neglected units, removing the sediment can sometimes expose pre-existing corrosion holes, or an old, brittle drain valve may fail to seal properly after being opened.
What tools do I need to flush a water heater?
To flush a standard tank water heater, you will need a standard garden hose, a flathead screwdriver, a large bucket, safety goggles, and thick work gloves to protect your hands from hot pipes.
Conclusion
Taking the time to perform routine maintenance on your water heater is one of the easiest ways to protect your home’s plumbing system, lower energy use, and extend your system’s lifespan. Whether you have a standard tank system or a modern tankless unit, keeping internal components free of mineral scale and sediment supports reliable hot water over the long term.
If you run into a stubborn drain valve, suspect an older tank has heavy corrosion, or simply want an experienced technician to handle the job, the team at Franklin Plumbing & Drain Cleaning can help. We serve homeowners throughout Columbia, SC, and nearby communities including Lexington, SC, Irmo, SC, and Forest Acres, SC.
For routine flushing, repairs, or replacement guidance, Franklin Plumbing & Drain Cleaning is ready to help. Contact our professional water heater technicians to keep your hot water system running reliably.

professional
drain cleaning

highly
recommended

through
repairs

quality
work