Garbage Disposal Repair or Replacement: How to Know Which You Need
Home »
Repair or Replace Your Garbage Disposal?
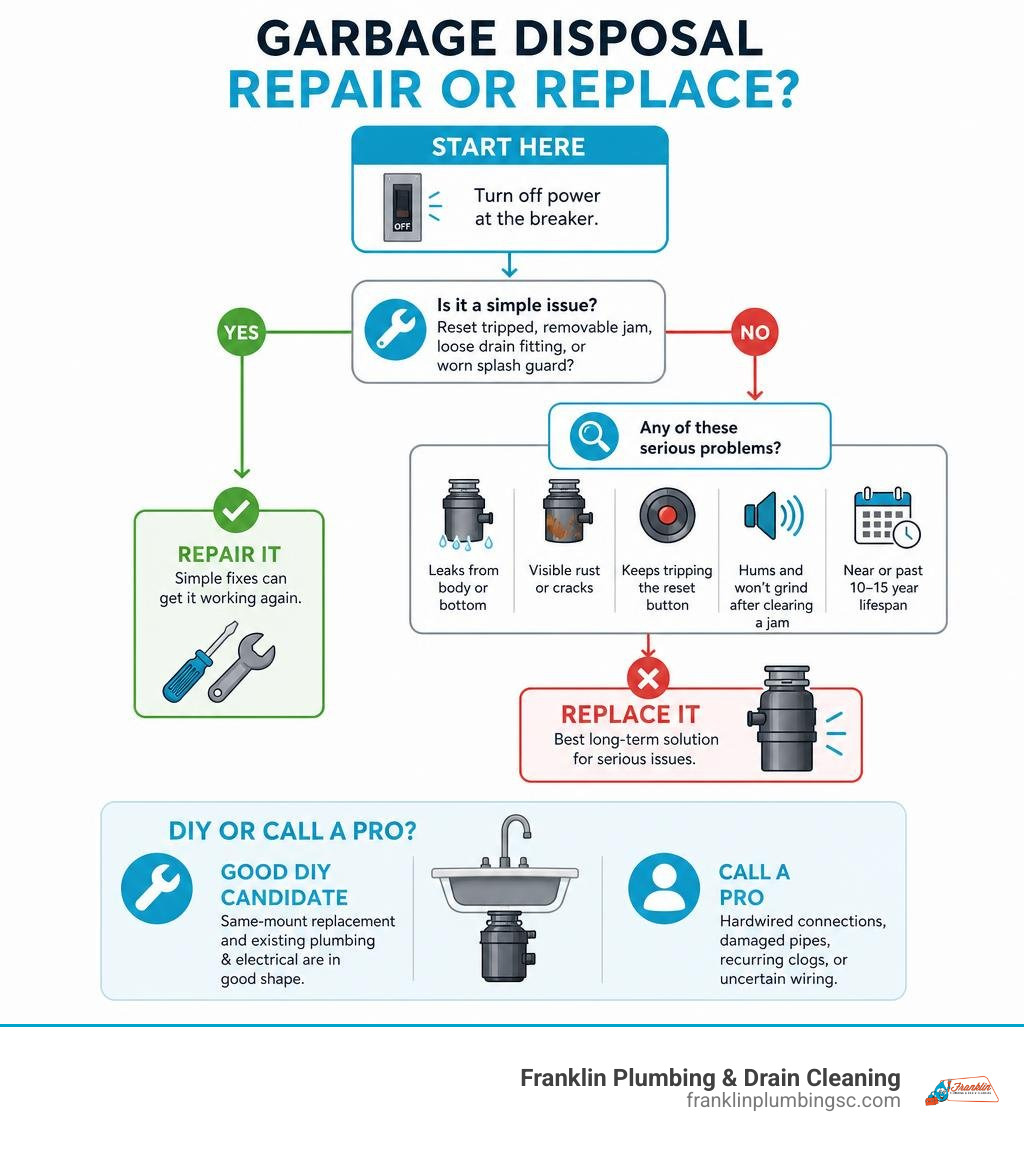
Replace a garbage disposal when it leaks from the unit’s body, has visible rust or cracks, keeps tripping the reset button, or hums and will not grind after you safely clear a jam. A loose drain fitting, worn splash guard, or simple jam may be repairable. But a disposal near or past its typical 10-to-15-year lifespan is often a better candidate for replacement than another repair.
Before deciding, turn off power at the breaker. Check for a reset-button trip, a removable jam, and leaks at the drain connections. If water is coming from the bottom or main casing, the internal seal has likely failed and the unit should be replaced.
A same-mount garbage disposal replacement can be a manageable DIY project when the plumbing and electrical setup are already in good shape. Hardwired connections, damaged pipes, recurring clogs, or uncertain wiring are good reasons to call a professional.
Our Franklin Plumbing & Drain Cleaning team can help you pinpoint whether your disposal needs a quick repair or a full replacement.
Repair vs. Replace: How to Diagnose Your Kitchen Disposal Problem
Kitchen sink disposers work hard every day, quietly grinding meal scraps until something suddenly goes wrong. When your disposal stops working mid-cleanup, standing water gathers in the sink basin, bringing dishwashing routines to an immediate halt. Before rushing out to purchase new equipment or attempting to disassemble your plumbing, it helps to understand what the specific symptoms are telling you.
Many common garbage disposal problems stem from minor mechanical jams, electrical overloads, or loose exterior connections that take only a few minutes to address. In other instances, internal mechanical wear, cracked grinding chambers, or failing motor seals mean that ongoing repairs will only waste time and money. Our team at Franklin Plumbing & Drain Cleaning provides dedicated garbage disposal service to help homeowners quickly determine the safest and most practical course of action.
| Symptom / Issue | Primary Cause | Recommended Action | Typical Lifespan Impact |
|---|---|---|---|
| Low hum with motionless blades | Mechanical jam in flywheel | Insert 1/4-inch hex wrench in bottom socket, clear obstruction, reset | No long-term impact if resolved promptly |
| No power, no sound at all | Tripped thermal overload switch or breaker | Check breaker box, press red reset button beneath unit | None |
| Water dripping from PVC slip nuts | Loose connection or worn rubber washer | Tighten slip nut by hand or replace worn drain gasket | Repairable without unit replacement |
| Water leaking from bottom housing | Failed internal motor shaft seal | Install a replacement disposal unit | Unit has reached end of mechanical life |
| Continuous reset button tripping | Failing electrical motor windings | Replace the disposal | Indicates terminal electrical breakdown |
| Heavy corrosion or casing cracks | Metal fatigue and acidic food degradation | Full unit replacement | Unrepairable structural failure |
When a Quick Repair Solves the Issue
Not every quiet or stuck disposal requires a trip to the hardware store. Disposals feature built-in safety mechanisms designed to protect the motor from burning out when food scraps create excessive resistance.
If your unit refuses to turn on and makes zero sound when you flip the wall switch, look underneath the sink. Located on the bottom or lower side of the housing is a small red button known as the thermal overload protector. When the motor encounters excessive heat or an immovable obstruction, this switch pops out to cut electrical flow. After shutting off the wall switch, pressing this red button back into place often restores normal operation immediately.
When the unit hums softly without spinning, the grinding plate is mechanically jammed by a hard foreign object such as a fruit pit, bone fragment, or dropped utensil. Never place your hand inside the grinding chamber to clear a blockage. Instead, look at the center of the unit’s baseplate underneath the cabinet.
You will find a small, hexagonal socket designed specifically for a 1/4-inch hex wrench or disposal unjamming tool. Inserting the wrench and working it back and forth manually rotates the flywheel, freeing the stuck object. Once the plate moves freely, reach into the sink with tongs or pliers to retrieve the dislodged item, reset the thermal switch, and turn on the cold water.
External leaks around the sink flange or the tubular drain assembly are also straightforward repairs. If you notice water trickling down the exterior of the upper mounting collar, the seal created by the original plumber’s putty beneath the sink flange may have dried out and cracked over time.
Similarly, small drips near the discharge tube or P-trap fittings can generally be resolved by tightening the plastic slip nuts or replacing worn rubber bevel washers. If food scraps splash backward during use, the removable rubber splash guard seated in the sink opening has likely lost its flexibility and can be replaced in seconds without altering the underlying plumbing.
Homeowners who are also troubleshooting moisture around the cabinet base may want to compare disposal leaks with other signs of a hidden water leak before assuming the disposal is the only issue.
Signs You Need a Complete Garbage Disposal Replacement
Certain failure modes signal that your disposal has reached the end of its serviceable life. The clearest indicator is water dripping directly from the bottom vents or electrical access plate of the disposal housing.
This symptom indicates that the internal water seal separating the grinding chamber from the electric motor has degraded. Once water breaches this internal barrier, it enters the motor casing, creating a serious electrical hazard while corroding internal bearings. Internal seal failure cannot be corrected with external sealant or new gaskets, making a complete replacement essential.
Visible corrosion, rust flakes along the outer casing, or hairline cracks in the plastic housing also mandate a new installation. Rust weakens the mounting structure and will eventually cause sudden, severe under-sink leaks that damage cabinetry, flooring, and surrounding drywall.
Additionally, if your disposal frequently trips your home’s circuit breaker or the thermal overload button despite clear grinding plates and normal food loads, the electric motor windings are deteriorating. When units approach 10 to 15 years of age, repeated mechanical repairs rarely deliver lasting performance. In these scenarios, replacing the aging appliance protects your cabinetry from water damage and restores quiet, reliable kitchen functionality.
Step-by-Step Guide to DIY Garbage Disposal Replacement
Swapping out an old kitchen disposal is an achievable task for a confident homeowner when the existing drain layout and electrical supply remain unchanged. Taking a systematic approach ensures clean connections, prevents leaks, and keeps your under-sink area clean throughout the project.
Before starting any plumbing project, make sure your work area is prepared and safety precautions are firmly in place. Proper preparation makes every subsequent step smoother, whether you are completing a quick swap or handling a broader water fixture installation in your kitchen.
Removing the Old Unit and Prepping the Sink Flange
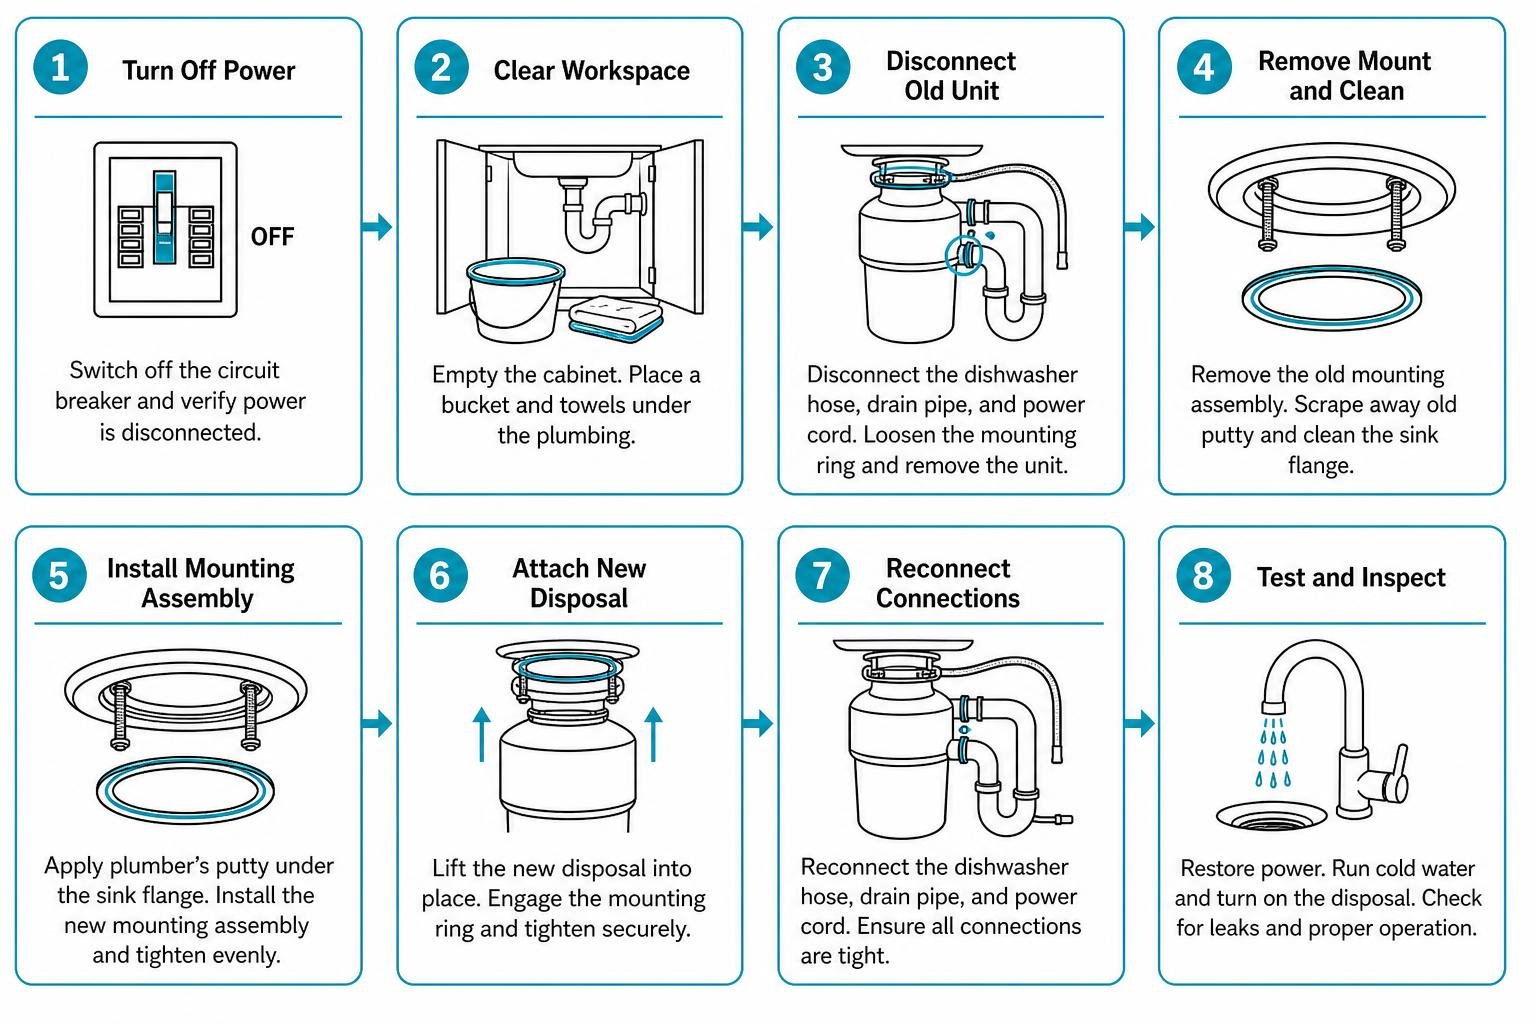
Safety begins at the electrical service panel. Locate the circuit breaker powering your kitchen disposal and switch it to the off position. Verify the power is disconnected by flipping the disposal wall switch on and off, then test the wiring underneath using a non-contact voltage tester.
Once you confirm the circuit is inactive, clear out the base cabinet completely. Position a shallow bucket and a few absorbent towels beneath the plumbing connections to catch any standing water trapped inside the P-trap or disposal housing.
Begin disassembly by disconnecting the plumbing connections:
- Loosen the slip nuts securing the discharge tube to the drain P-trap using adjustable channel-lock pliers.
- If a dishwasher is connected, loosen the hose clamp on the upper inlet tube and gently slide the flexible hose free.
- Support the heavy weight of the disposal from underneath using your hand or a sturdy prop, such as a wooden block or inverted paint container.
- Insert a large flathead screwdriver or mounting tool into the loop of the lower mounting ring.
- Turn the mounting ring counterclockwise to disengage the locking tabs, lowering the heavy disposal away from the sink collar.
- Remove the electrical cover plate on the bottom of the detached disposal, loosen the wire connectors, unthread the ground screw, and release the cable clamp to free the electrical line.
With the old appliance out of the cabinet, inspect the existing sink flange. If your replacement unit uses an identical mounting system and the current flange is tightly sealed with no signs of corrosion or leaks, you can leave the mounting ring in place to save installation time.
However, if you are changing mounting styles or the old flange shows deterioration, remove the snap ring holding the mounting collar beneath the sink using a flathead screwdriver. Push the flange up through the top of the sink opening, scrape away all old plumber’s putty from the stainless steel or composite basin using a plastic putty knife, and clean the surface thoroughly with rubbing alcohol. For stubborn drain lines or recurring backup issues encountered during removal, scheduling professional drain cleaning in Columbia, SC can clear accumulated grease and organic buildup before the new unit is hung.
If the water appears to be coming from outside the disposal body, our leak troubleshooting guide on DIY vs. professional leak detection in Lexington, SC can help you decide when a simple inspection is enough and when specialized detection equipment is the safer choice.
Knockout Plugs, Mounting, and Wiring the New Disposer
Before lifting the new disposal under the sink, there is one vital step that must never be overlooked if you have an automatic dishwasher: removing the factory knockout plug.
Inside the small, molded dishwasher inlet nipple on the side of the upper chamber sits a solid plastic barrier. If you connect your dishwasher line without removing this barrier, wastewater from your dishwasher cannot enter the disposal and will flood your kitchen during the first wash cycle.
Place the disposal on its side, insert a flathead screwdriver or steel punch directly against the interior plug, and strike the handle firmly with a hammer until the circular plastic disc breaks free. Reach inside the disposal chamber through the top throat or shake the unit upside down to retrieve the loose plastic slug completely. Leaving this plastic piece inside will jam the new impellers the moment power is restored.
If you installed a new sink flange, roll a 1/2-inch thick rope of fresh plumber’s putty and press it evenly underneath the lip of the new flange. Firmly seat the flange straight down into the sink drain opening. Place a towel inside the sink and set the heavy disposal on top of the flange to hold it down while you work beneath the sink.
From underneath, slide the fiber gasket, backup flange, and triangular mounting ring over the flange neck. Snap the wire retaining ring into the groove on the flange neck, then tighten the three mounting screws evenly with a screwdriver until the entire assembly is firmly compressed against the underside of the sink basin. Wipe away any excess plumber’s putty that squeezes out around the flange inside the sink.
Next, wire the new disposal while it remains easily accessible on the floor:
- Remove the lower electrical access plate and strain relief clamp.
- Feed the electrical cable through the clamp into the housing.
- Connect the black supply wire to the black disposal lead using an approved wire nut.
- Connect the white neutral supply wire to the white disposal lead using a wire nut.
- Fasten the bare copper or green grounding conductor securely beneath the green ground screw on the metal housing.
- Tighten the strain relief clamp to protect the wires from movement and reinstall the metal access cover.
Reconnecting Plumbing Lines and Testing for Leaks
Lift the wired disposal unit into position, aligning its top mounting ears with the downward ramps of the sink mounting collar. Lift the disposal upward until the tabs seat into place, then rotate the lower mounting ring clockwise by hand to support the unit’s weight.
Before locking the collar tight, turn the disposal body so that the discharge outlet aligns naturally with your existing drain line and P-trap. Insert your screwdriver or mounting tool into the ring lug and twist firmly clockwise until you feel the locking mechanism snap into its seated detent.
Attach the rubber discharge gasket and the black elbow tube to the side outlet using the supplied metal flange and bolts. Reconnect the PVC drain arm and P-trap, ensuring all slip-joint washers point in the correct direction with their beveled edges facing toward the pipe socket. Tighten the slip nuts firmly by hand, followed by a light quarter-turn with channel-lock pliers. Avoid over-tightening plastic plumbing fittings, which can crack the slip nuts or distort the internal rubber seals.
Slide your dishwasher drain hose over the upper inlet nipple and secure it with a new stainless steel worm-drive hose clamp. Make sure the dishwasher hose loops upward to touch the underside of the countertop before descending to the disposal inlet. This high-loop configuration prevents sink wastewater from siphoning back into your clean dishwasher.
Once all plumbing connections are secured, restore power at the circuit breaker panel. Run cold water through the unit at medium flow, observing all pipe joints, the mounting collar, and the dishwasher connection for any moisture.
Fill the sink basin halfway with water using the drain stopper, then pull the plug to allow a full volume of water to rush through the entire assembly under gravitational pressure. Run your hands and a clean, dry paper towel along every seam beneath the sink to verify there are no slow drips. Finally, turn on the wall switch with cold water running to confirm smooth, quiet motor operation.
Key Factors When Selecting a New Kitchen Disposal Unit
Selecting the right replacement model ensures your kitchen plumbing operates smoothly for years without unexpected backups. Disposals vary significantly in motor design, grinding mechanics, sound insulation, and capacity.
Proper disposal selection also protects municipal water infrastructure across Midlands communities. Residents in West Columbia, Cayce, and neighboring areas benefit from responsible food waste practices that align with local solid waste and grease management recommendations outlined by municipal guidelines, such as the Sanitation & Recycling resources in West Columbia, SC.
Disposal units fall into two main operational categories:
- Continuous Feed Disposals: The most common design across residential homes, continuous feed units operate via a standard wall switch or countertop air switch. They run continuously as long as the switch is engaged, allowing you to feed food scraps gradually while cold water runs. They provide fast, convenient cleanup for active family kitchens.
- Batch Feed Disposals: These models require you to load food waste into the grinding chamber and insert a specialized stopper lid into the sink drain opening to activate the motor. Because the unit cannot run without the stopper firmly in place, batch feed models offer extra peace of mind for households with small children and eliminate the need for a dedicated wall switch.
Internal material construction directly dictates equipment longevity. Entry-level units frequently utilize galvanized steel for their shredder rings and swivel impellers. While functional for light use, galvanized components remain vulnerable to corrosion from acidic foods like citrus and tomatoes, generally providing an operational lifespan of 5 to 8 years.
Mid-grade and premium units feature heavy-gauge stainless steel grind rings, impellers, and grind chambers. Stainless steel resists corrosion, maintains sharp grinding edges longer, and easily lasts 10 to 15 years with minimal maintenance.
Sound dampening is another key differentiator. Basic units lack internal baffling, producing sound levels above 80 decibels during operation. Upgraded units incorporate multi-layer acoustic foam insulation, anti-vibration sink mounts, and flexible drain couplings that keep operating noise down between 60 and 70 decibels, allowing normal kitchen conversation while the unit runs.
How to Choose the Right Unit for a Garbage Disposal Replacement
Motor horsepower (HP) sizing should be matched to your household size, cooking habits, and food preparation needs:
- 1/3 Horsepower: Best suited for light use, single-person households, or vacation properties where the disposal is used infrequently for soft food scraps.
- 1/2 Horsepower: A reliable baseline for small households of one to two people. Handles everyday vegetable clippings, soft leftovers, and light meal cleanup.
- 3/4 Horsepower: The practical sweet spot for average single-family households of three to five people. These motors deliver higher torque, handle fibrous scraps like celery and potato peels with ease, resist jamming, and incorporate better sound insulation.
- 1 Horsepower or Greater: Designed for large families, avid home chefs, or heavy meal prep routines. These heavy-duty induction motors easily grind tough waste, including small bones and dense cooked meats, while operating quietly and smoothly.
When replacing an existing unit, check the manufacturer mounting configuration. Choosing a unit that shares the common 3-bolt mounting platform allows you to reuse the existing sink collar assembly, shortening installation time considerably. Always verify the manufacturer warranty coverage, as higher-quality stainless steel disposals typically include multi-year or lifetime in-home service guarantees.
Replacement Costs and Professional Plumbing Considerations
When planning a kitchen plumbing upgrade, homeowners weigh the convenience of doing it themselves against the peace of mind that comes with professional installation. While a straightforward swap utilizing existing mounting collars and matched wiring is manageable with basic hand tools, unforeseen complications under the sink can turn a simple job into a lengthy project.
Our licensed technicians at Franklin Plumbing & Drain Cleaning provide dependable installations for homeowners throughout our extensive service region, including Southeast Columbia, SC, backed by a 100% satisfaction guarantee.
Professional replacement includes several critical advantages that protect your home from long-term moisture hazards:
- Plumbing Alignment and Drain Rework: New disposals often have different dimensional clearances than older models. If the discharge port sits lower than the existing wall drain rough-in, water will stand inside the grinding chamber, causing premature motor burnout and foul odors. A professional plumber will adjust the P-trap geometry, install fresh tailpieces, and ensure optimal drainage slope.
- Electrical Safety and Code Compliance: Disposals require grounded, properly sized electrical circuits. Our technicians verify that under-sink junction boxes or GFCI-protected outlets meet current electrical safety codes, preventing hazardous electrical shorts around water pipes.
- Leak-Tight Sealing: Improperly compressed sink flanges or uneven plumber’s putty application can lead to small, unnoticed leaks that rot cabinet bottoms and damage subfloors over time. Professional installation ensures complete, watertight integrity from the sink lip to the sewer lateral.
- Full Appliance and Labor Warranties: Professional installations protect your manufacturer warranty terms and provide comprehensive labor guarantees, ensuring any unexpected fitting issues are resolved promptly.
If your kitchen plumbing features corroded galvanized supply lines, misaligned drainage pipes, or ungrounded wiring, bringing in an experienced professional ensures your new disposal operates safely and efficiently for years to come.
Frequently Asked Questions About Kitchen Disposals
How long does an average kitchen garbage disposal last?
A residential garbage disposal generally lasts between 10 and 15 years with proper care and regular cleaning. Entry-level units built with galvanized steel grinding components typically last 5 to 8 years before corrosion impacts performance. Premium models featuring heavy-gauge stainless steel grinding chambers and high-torque induction motors regularly exceed 12 to 15 years of dependable service.
How much does professional garbage disposal replacement cost in Columbia, SC?
Professional replacement costs vary depending on the motor horsepower selected, the brand and materials of the new unit, and the condition of your under-sink plumbing. Straightforward like-for-like swaps are very economical, whereas installations requiring custom drain line realignment, sink flange replacement, or electrical wiring upgrades require additional labor and specialized fittings.
Can I replace a garbage disposal myself without a plumber?
Yes, a homeowner with basic mechanical comfort and standard hand tools can replace an existing garbage disposal. The project is most straightforward when performing a same-mount replacement, which allows you to attach the new unit to the existing sink collar without replacing the drain flange or modifying the P-trap alignment.
What horsepower garbage disposal do I need for a family of four?
A 3/4-horsepower disposal is ideal for a standard family of four. This size provides ample motor torque and grinding power to manage daily meal preparation, fibrous vegetable cuttings, and dense food scraps without frequent jamming, while running quieter than smaller 1/2-horsepower entry-level motors.
Why is water leaking from the bottom of my garbage disposal?
Water leaking from the bottom vents or the lower reset button indicates that the unit’s internal motor shaft seal has degraded. This allows wastewater to breach the motor compartment. Because internal mechanical seals cannot be replaced or resealed from the outside, a disposal leaking from its lower casing must be replaced.
What happens if I forget to remove the dishwasher knockout plug?
If you connect a dishwasher drain hose to a new disposal without punching out the factory knockout plug, wastewater from your dishwasher cannot drain into the disposal. During the dishwasher’s initial drain cycle, water will back up into the appliance basin and overflow onto your kitchen floor.
How do I know if my disposal motor is burned out or just jammed?
If the unit hums softly when switched on but the blades do not spin, the flywheel is mechanically jammed by trapped food or a foreign object. If the unit makes no sound at all, the thermal overload switch has likely tripped. A motor is typically burned out only if it fails to operate after clearing jams and resetting the breaker, or if it produces smoke or an acrid electrical odor.
Is it cheaper to repair or replace a 10-year-old garbage disposal?
It is generally more practical and economical to replace a 10-year-old disposal. Units at this age are near the end of their design life, and spending money on temporary repairs or motor service often delays an inevitable replacement while increasing the risk of sudden under-sink leaks.
What tools are required for a same-mount garbage disposal replacement?
A same-mount replacement requires a flathead screwdriver, channel-lock pliers, a 1/4-inch hex wrench, wire strippers, wire nuts, a hammer and steel punch (for the dishwasher knockout), a bucket, and a non-contact electrical voltage tester to verify power shutoff.
How do I properly test for leaks after installing a new disposal?
To test for leaks, run cold water through the running disposal for two minutes while inspecting all fittings. Then, insert the sink stopper, fill the sink basin halfway with water, and release the stopper. The sudden rush of water pressure tests the sink flange, discharge gasket, and P-trap connections for any slow drips or weeping seams.
Conclusion
A dependable garbage disposal makes daily kitchen cleanups fast, simple, and clean. While clearing simple flywheel jams and resetting the thermal overload switch are easy weekend tasks, persistent body leaks, motor failures, and advanced corrosion indicate that installing a replacement unit is the smartest path forward.
If you encounter complex drain line configurations, hardwired electrical lines, or persistent moisture issues under your sink, Franklin Plumbing & Drain Cleaning can complete the installation safely and efficiently. We provide comprehensive residential plumbing, drain cleaning, and leak detection across Columbia, West Columbia, Lexington, Blythewood, and surrounding Midlands communities. Whenever safety concerns arise, specialized tools are required, or you simply want the peace of mind that comes with a 100% satisfaction guarantee, contact our professional garbage disposal technicians.

professional
drain cleaning

highly
recommended

through
repairs

quality
work